 Models and other goodies
There are two basic types of model formats for Q3.
The first is called an md3 and the other is called a prefab.
md3's are models created in modeling editors such as
3D StudioMax or Milkshape. They also make up the
weapons, players, and many of the effects you see in the
game. Prefabs on the other hand are models created in
Radiant just by using brushes and patches to form a
complex object. For now we'll just stick to md3's
since they've allready been made for us.
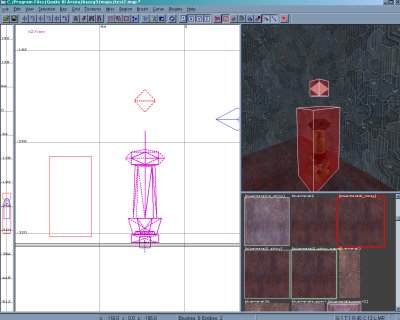
The first and easiest use of md3's is decoration. We'll place a floor
lamp in a corner of a room. Go over to the wireframe window and
right click on the desired location of your lamp. Now select misc in
the pop-up menu and then select misc_model. You will now see a
file menu and the entity menu appear. The file menu shows all of
the md3's that are available to you. Some are in folders and some
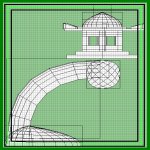
exist independantly. You'll see one md3 named kmlamp1 toward
the end of the list. select the file and now you should see a pink
wireframe of the lamp in your x,y,z window. You'll actually see the
model fully skinned in the 3D window with a bounding box around
it. The enity menu that also popped up is used to rotate models into
a desired position but since this model is the same on all sides just
hit 'n' to make the menu to go away. Now go ahead and drag the
lamp to a corner of the room and line it up with the floor. Make sure
the bounding box does not intersect with any other brush. If your
having trouble lining it up with the floor you can go to the grid
option in the menu and select grid1. This will allow you to move
the model just one unit at a time to really match it to the floor
perfectly. Use the insert and delete keys to zoom in and get a
good look at where the lamp is in relation to the floor.
Models and other goodies
There are two basic types of model formats for Q3.
The first is called an md3 and the other is called a prefab.
md3's are models created in modeling editors such as
3D StudioMax or Milkshape. They also make up the
weapons, players, and many of the effects you see in the
game. Prefabs on the other hand are models created in
Radiant just by using brushes and patches to form a
complex object. For now we'll just stick to md3's
since they've allready been made for us.
The first and easiest use of md3's is decoration. We'll place a floor
lamp in a corner of a room. Go over to the wireframe window and
right click on the desired location of your lamp. Now select misc in
the pop-up menu and then select misc_model. You will now see a
file menu and the entity menu appear. The file menu shows all of
the md3's that are available to you. Some are in folders and some
exist independantly. You'll see one md3 named kmlamp1 toward
the end of the list. select the file and now you should see a pink
wireframe of the lamp in your x,y,z window. You'll actually see the
model fully skinned in the 3D window with a bounding box around
it. The enity menu that also popped up is used to rotate models into
a desired position but since this model is the same on all sides just
hit 'n' to make the menu to go away. Now go ahead and drag the
lamp to a corner of the room and line it up with the floor. Make sure
the bounding box does not intersect with any other brush. If your
having trouble lining it up with the floor you can go to the grid
option in the menu and select grid1. This will allow you to move
the model just one unit at a time to really match it to the floor
perfectly. Use the insert and delete keys to zoom in and get a
good look at where the lamp is in relation to the floor.
 Once the lamp is positioned go ahead and deselect the model by
hitting the esc key. Now go ahead and add a little light to the corner
by right clicking on top of the lamp and selecting the light entity.
Change the value to 200 and hit 'k' to bring up the color menu.
Choose the color you want and deselect the light. You can select
both items to highlight their bounding boxes to see how close
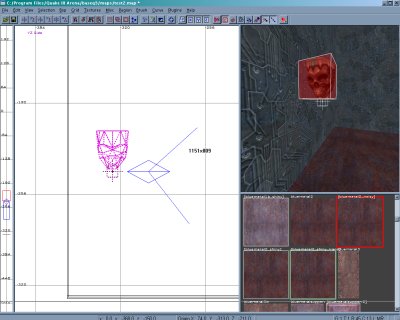
they are to each other. The next model we'll bring in is a wall
lamp. Once again right click on the desired loacation in the
wireframe window and select misc and then misc_model.
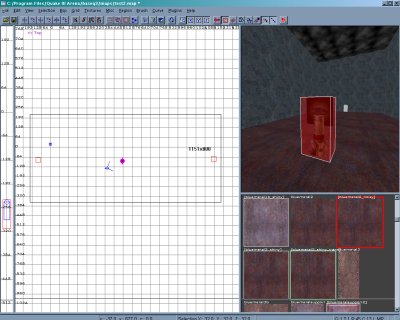
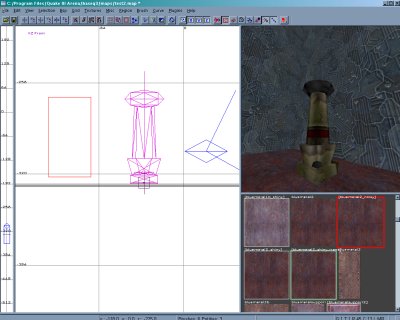
Select the storch folder in the file menu and then select the
storch.md3 file. You'll see the wall lamp model shaped like a
skull appear. Drag it close to the opposite wall where you
placed the first lamp. Now it's time to line it up with the wall.
Once the lamp is positioned go ahead and deselect the model by
hitting the esc key. Now go ahead and add a little light to the corner
by right clicking on top of the lamp and selecting the light entity.
Change the value to 200 and hit 'k' to bring up the color menu.
Choose the color you want and deselect the light. You can select
both items to highlight their bounding boxes to see how close
they are to each other. The next model we'll bring in is a wall
lamp. Once again right click on the desired loacation in the
wireframe window and select misc and then misc_model.
Select the storch folder in the file menu and then select the
storch.md3 file. You'll see the wall lamp model shaped like a
skull appear. Drag it close to the opposite wall where you
placed the first lamp. Now it's time to line it up with the wall.
 Next we'll attatch the model to the wall and add a
little fire to the mix.
Next we'll attatch the model to the wall and add a
little fire to the mix.