 Camera Portals
This is deffinately one of the most confusing
elements available to level designers. I've
received multiple requests to explain this effect
so here it is. It's actually not that bad.
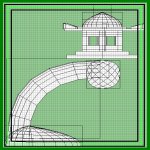
I've incorporated the effect with one of my portal
models but you can use whatever you want. Create
a brush that will be the teleporting veiw. This brush
will display the veiw where the player will launch
into. Use the 'common' and then 'no draw' texture
for the brush and then select just the surface by
hitting (ctrl+shift+mouse1) and use 'sfx' and then
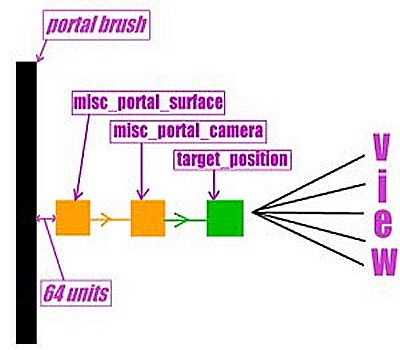
'portal_sfx' to cover the facing brush. Now right
click on the 2D window and select 'misc_portal_surface'
and place it in the center of the portal brush with no
more than 64 units between the entity and the brush.
Now directly in front of the new entity right click again
on the 2D window and select 'misc_portal_camera' and
deselect the entity. Now figure out where you'd like to
point the camera view and again right click on the 2D
window and select 'target_position'. Think of this entity
as being the eye of your camera.
Camera Portals
This is deffinately one of the most confusing
elements available to level designers. I've
received multiple requests to explain this effect
so here it is. It's actually not that bad.
I've incorporated the effect with one of my portal
models but you can use whatever you want. Create
a brush that will be the teleporting veiw. This brush
will display the veiw where the player will launch
into. Use the 'common' and then 'no draw' texture
for the brush and then select just the surface by
hitting (ctrl+shift+mouse1) and use 'sfx' and then
'portal_sfx' to cover the facing brush. Now right
click on the 2D window and select 'misc_portal_surface'
and place it in the center of the portal brush with no
more than 64 units between the entity and the brush.
Now directly in front of the new entity right click again
on the 2D window and select 'misc_portal_camera' and
deselect the entity. Now figure out where you'd like to
point the camera view and again right click on the 2D
window and select 'target_position'. Think of this entity
as being the eye of your camera.
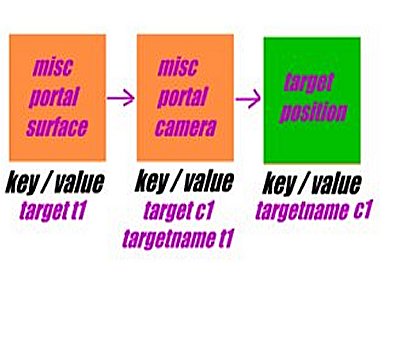
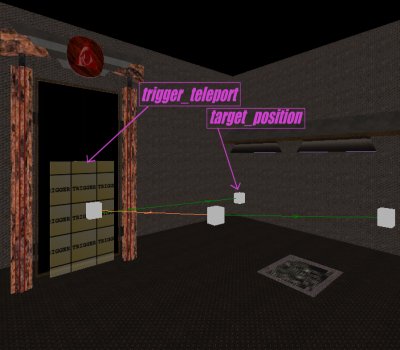 Now deselect the 'target_position' box and select the
portal surface box first and then select the portal camera
box next by using (shift+mouse1) and then hit (ctrl+k).
You should see an orange line go between the two entities.
Now do the same with the camera entity and the target
position. Once again you'll see the connecting line but
now it will be green. This is a shortcut that can be used
for jump pads, teleporters, and any connecting entity.
Above the image on the right shows this effect used with
a standard teleporter. You can reveiw the teleport feature
by visiting the tutorial here. Below is an image of an
example of the key and value structure for this effect.
Now deselect the 'target_position' box and select the
portal surface box first and then select the portal camera
box next by using (shift+mouse1) and then hit (ctrl+k).
You should see an orange line go between the two entities.
Now do the same with the camera entity and the target
position. Once again you'll see the connecting line but
now it will be green. This is a shortcut that can be used
for jump pads, teleporters, and any connecting entity.
Above the image on the right shows this effect used with
a standard teleporter. You can reveiw the teleport feature
by visiting the tutorial here. Below is an image of an
example of the key and value structure for this effect.
 There is also an angle feature that can be used
to manipulate the yaw and rotation of the camera
veiw but is a real pain to make work properly. A buddy
of mine suggested just going with the default and it
seems to work just fine. However, if your feeling
adventureous then go for it! On the next page you
can see an example of the effect.
There is also an angle feature that can be used
to manipulate the yaw and rotation of the camera
veiw but is a real pain to make work properly. A buddy
of mine suggested just going with the default and it
seems to work just fine. However, if your feeling
adventureous then go for it! On the next page you
can see an example of the effect.