 Creating in-game support
Providing in-game support with your new
map not only makes installation much easier
for the end user but also gives your map more
of a proffessional look and feel. Having a real
single player option opens your map to more
people and gives longevity to your work. Let's
face it, most maps will never be played online
so a single player game fills the gap.
The first thing you need to do is download a nice
utility called ArenaMaster. You can download it
here. Install and launch the program and you
should see the menu below. The utility creates
an .arena file which is a basic script file that tells
the game's interface what kind of a game it is, i.e.
FFA, tourney, CTF, or TDM. It also tells the interface
what bots to include and the frag limit.
Creating in-game support
Providing in-game support with your new
map not only makes installation much easier
for the end user but also gives your map more
of a proffessional look and feel. Having a real
single player option opens your map to more
people and gives longevity to your work. Let's
face it, most maps will never be played online
so a single player game fills the gap.
The first thing you need to do is download a nice
utility called ArenaMaster. You can download it
here. Install and launch the program and you
should see the menu below. The utility creates
an .arena file which is a basic script file that tells
the game's interface what kind of a game it is, i.e.
FFA, tourney, CTF, or TDM. It also tells the interface
what bots to include and the frag limit.
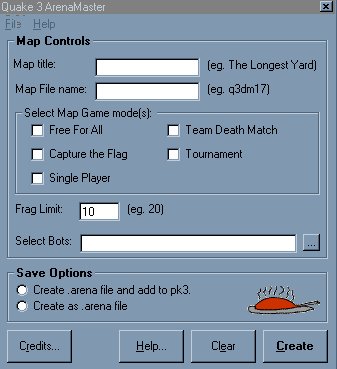 Just enter the title of your map and the actual
file name. Select the gaming formats that you
desire and the frag limit. The next step is to
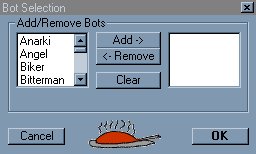
choose the bots that you wish to spawn in the
map once the game launches. Another menu
will pop up with a list of all the bots available in the
game. Make your selections and then save the
file as an .arena file. Your new .arena file will go
into the 'scripts' folder within the baseq3
directory in Quake 3. You can also include
the file in a .pk3 file by looking at the .pk3
tutorial here. That's all folks!
Just enter the title of your map and the actual
file name. Select the gaming formats that you
desire and the frag limit. The next step is to
choose the bots that you wish to spawn in the
map once the game launches. Another menu
will pop up with a list of all the bots available in the
game. Make your selections and then save the
file as an .arena file. Your new .arena file will go
into the 'scripts' folder within the baseq3
directory in Quake 3. You can also include
the file in a .pk3 file by looking at the .pk3
tutorial here. That's all folks!
 Now go on to learn the wonders of levelshots
and how to use them to pimp your work.
Now go on to learn the wonders of levelshots
and how to use them to pimp your work.