 Creating the PK3 File
Once you've finished your map it's time to convert
it from the standard .bsp file to a .pk3 file. You'll
have to do this if you ever want to publish your map
and let other people play it. PakScape is the utility
of choice that will compress your work and make
it substantially smaller for download.
If you've ever used a file compression tool like Winzip
then you have a basic idea about compressing files
and uncompressing file downloads. PakScape does
the same thing but it supports the .pk3 format that id
uses to shrink the maps within the game. Your custom
map must conform to a specific folder format in order
for the game to use the level you've created. Most new
maps published today come with in-game support
that allow the user to simply unzip the file into the
baseq3 folder and use the 'single player/skirmish'
option within the game to play the map. This is what
I'll show you how to accomplish. The first step is to
get PakScape by downloading it here. The next step
will be to create a folder in 'my documents' called
'my map'. You'll want to create the following folders
within this folder as follows.
Creating the PK3 File
Once you've finished your map it's time to convert
it from the standard .bsp file to a .pk3 file. You'll
have to do this if you ever want to publish your map
and let other people play it. PakScape is the utility
of choice that will compress your work and make
it substantially smaller for download.
If you've ever used a file compression tool like Winzip
then you have a basic idea about compressing files
and uncompressing file downloads. PakScape does
the same thing but it supports the .pk3 format that id
uses to shrink the maps within the game. Your custom
map must conform to a specific folder format in order
for the game to use the level you've created. Most new
maps published today come with in-game support
that allow the user to simply unzip the file into the
baseq3 folder and use the 'single player/skirmish'
option within the game to play the map. This is what
I'll show you how to accomplish. The first step is to
get PakScape by downloading it here. The next step
will be to create a folder in 'my documents' called
'my map'. You'll want to create the following folders
within this folder as follows.
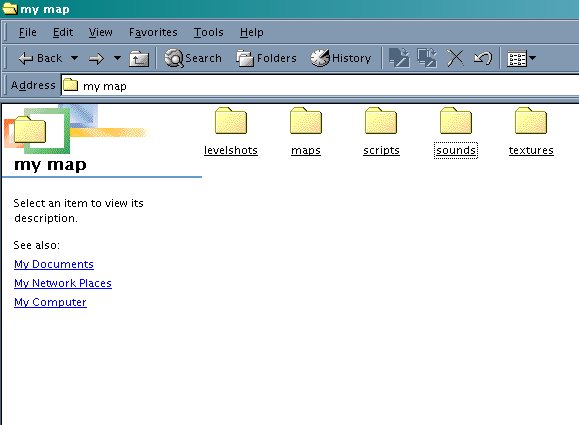 If you go into the 'quake III arena/baseq3' folder you'll
find all of the files necessary after your map is saved.
'levelshots' shows the image displayed when the map loads.
'maps' has the .bsp and .ass file that draws the map with bot support.
'scripts' is where the .arena file rests allowing in-game support.
'sounds' is where you'll have your own .wav files for sound.
'textures' is where any custom textures you've used reside.
Go ahead and launch PakSacape and reduce the program
to a window that will be displayed on your desktop. Then
open the 'my map' folder in 'my documents' and do the same
so that the window is above PakScape like the shot below.
If you go into the 'quake III arena/baseq3' folder you'll
find all of the files necessary after your map is saved.
'levelshots' shows the image displayed when the map loads.
'maps' has the .bsp and .ass file that draws the map with bot support.
'scripts' is where the .arena file rests allowing in-game support.
'sounds' is where you'll have your own .wav files for sound.
'textures' is where any custom textures you've used reside.
Go ahead and launch PakSacape and reduce the program
to a window that will be displayed on your desktop. Then
open the 'my map' folder in 'my documents' and do the same
so that the window is above PakScape like the shot below.
 Now copy the files from the baseq3 folder into the
appropriate folders into your 'my maps' folder.
Once this is done just drag the folders into PakScape
and save the whole lot as a .pk3 file. The objective
is to mimic the file structure in the game within
your .pk3 file. The only additional file to add will
be a 'read me' file that explains to the user how to
install the map and some details about how the
map was made including credits to anyone you
borrowed from. This could include textures, prefabs,
or models. For an example of a 'read me' file click here.
Just open notepad in the accessories section of
Windows to write the file. Then take the 'read me'
file along with your .pk3 and compress them using
PakScape again but now save the combination as
a .zip file so that people can download and use it.
Now copy the files from the baseq3 folder into the
appropriate folders into your 'my maps' folder.
Once this is done just drag the folders into PakScape
and save the whole lot as a .pk3 file. The objective
is to mimic the file structure in the game within
your .pk3 file. The only additional file to add will
be a 'read me' file that explains to the user how to
install the map and some details about how the
map was made including credits to anyone you
borrowed from. This could include textures, prefabs,
or models. For an example of a 'read me' file click here.
Just open notepad in the accessories section of
Windows to write the file. Then take the 'read me'
file along with your .pk3 and compress them using
PakScape again but now save the combination as
a .zip file so that people can download and use it.