 Jump Pads continued ...
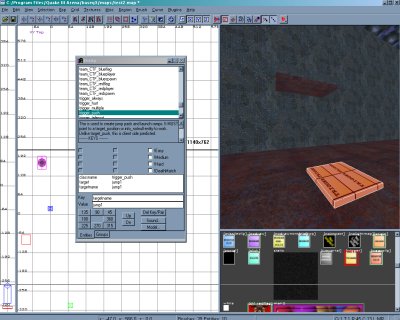
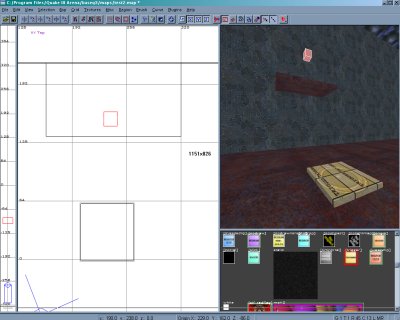
Now it's time to tell the Q3 engine that your newly created
'trigger' brush is a jump pad and also where we want to lauch to.
With the trigger brush highlighted take your mouse pointer over to the
wireframe window and right-click on your mouse. Choose the 'trigger'
option and then select 'trigger_push'. This will designate your jump pad as
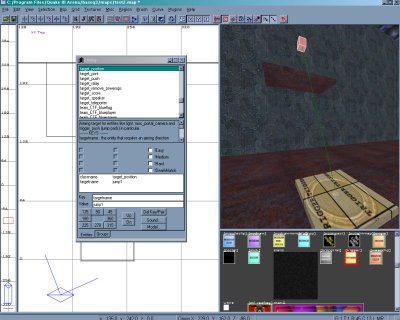
a 'pushing' entity that will kick you in the air. Now with the brush still
highlighted hit the 'n' key that will bring up the entity window. Now with the
enity menu displayed, go to the key field and enter the word 'target'. In the field
below the key is the value of the key. In the value field enter the name of
the jump pad such as 'jump1'. This tells the Q3 engine that your trigger brush
will push the player toward a target called 'jump1'.
Jump Pads continued ...
Now it's time to tell the Q3 engine that your newly created
'trigger' brush is a jump pad and also where we want to lauch to.
With the trigger brush highlighted take your mouse pointer over to the
wireframe window and right-click on your mouse. Choose the 'trigger'
option and then select 'trigger_push'. This will designate your jump pad as
a 'pushing' entity that will kick you in the air. Now with the brush still
highlighted hit the 'n' key that will bring up the entity window. Now with the
enity menu displayed, go to the key field and enter the word 'target'. In the field
below the key is the value of the key. In the value field enter the name of
the jump pad such as 'jump1'. This tells the Q3 engine that your trigger brush
will push the player toward a target called 'jump1'.
 Now we have to give the trigger brush a target to aim for. Right-click on the
wireframe window where you want to jump to and select 'target' and then
'target_position'. You'll see a little box appear that tells the trigger brush
where to send the player. Once again with the box selected hit the 'n' key to
bring up the entity menu. Once again go to the key field but this time enter
the word 'targetname' and in the value field enter the same name of 'jump1'.
You should see a green line connect the trigger brush with the target position box.
Now we have to give the trigger brush a target to aim for. Right-click on the
wireframe window where you want to jump to and select 'target' and then
'target_position'. You'll see a little box appear that tells the trigger brush
where to send the player. Once again with the box selected hit the 'n' key to
bring up the entity menu. Once again go to the key field but this time enter
the word 'targetname' and in the value field enter the same name of 'jump1'.
You should see a green line connect the trigger brush with the target position box.
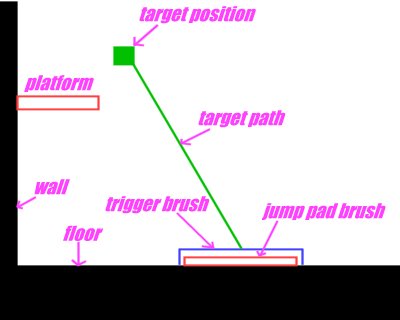 That's it! Understand that the trigger brush is the point at which the player
launches and the target position is the point at which the player is released
from the jump. It's important to know this to fine tune your jumps so your
players aren't launched into ceilings or walls. With the target position box
selected you can move the jumping destination freely so you can get it just right.
Now let's see the fruit of our labor. Save the map, compile, and launch the game.
That's it! Understand that the trigger brush is the point at which the player
launches and the target position is the point at which the player is released
from the jump. It's important to know this to fine tune your jumps so your
players aren't launched into ceilings or walls. With the target position box
selected you can move the jumping destination freely so you can get it just right.
Now let's see the fruit of our labor. Save the map, compile, and launch the game.