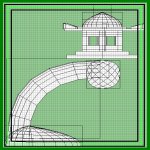
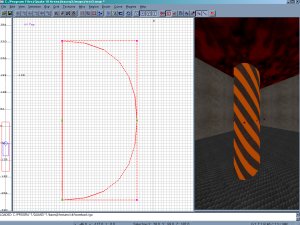
Bended ColumnsThis will show you how to make an object thatseems to be very popular in many maps. I've neverused it but thought it would be good to at least showhow it's made. It's an object that is truly a pain to make.
I've eliminated the texture window to get a really good veiw
of the work. Go ahead and draw a basic brush as pictured
below. Bring it toward the edge of the surface you want to
connect it to. Remember that the initial length of the brush
will affect the point at which it makes contact . Now go up
to the toolbar and select 'curves' then 'more end caps, bevels'
and finally 'square endcap'. You'll notice that the actual
curve will always face the top of the brush. For this tutorial
this will be just fine but for other objects you may have to
flip the brush to line up properly. Now switch the x, y, z veiw
so that your looking at the top of the brush and zoom in using
the 'insert' or 'delete' keys.
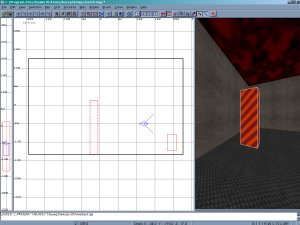
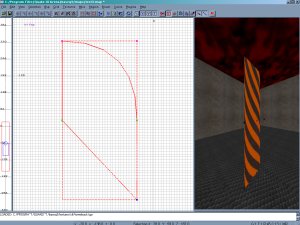
Now hit the 'v' key to activate the vector tool. The vector is
similar to the edge tool but is capable of manipulating more
that one face at a time without switching veiws. You'll use this
feature most often to change curved brushes. You'll see little
pink and green boxes that outline the brush. The objective
will be to drag the boxes so that the curved surface lines up
with all four sides of the bounding box. Try to do this by using
the screen shots below as a quide.
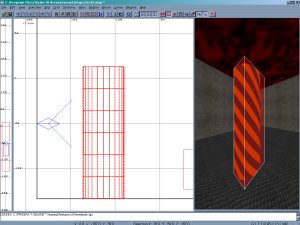
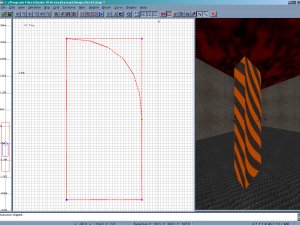
Now the brush should look like a basic rectangle. The
reason you have to use a curved patch(brush) to start
out with is that a standard brush cannot bend. You can
only move the edges. Time to bend this baby!
 Bended Columns
This will show you how to make an object that
seems to be very popular in many maps. I've never
used it but thought it would be good to at least show
how it's made. It's an object that is truly a pain to make.
I've eliminated the texture window to get a really good veiw
of the work. Go ahead and draw a basic brush as pictured
below. Bring it toward the edge of the surface you want to
connect it to. Remember that the initial length of the brush
will affect the point at which it makes contact . Now go up
to the toolbar and select 'curves' then 'more end caps, bevels'
and finally 'square endcap'. You'll notice that the actual
curve will always face the top of the brush. For this tutorial
this will be just fine but for other objects you may have to
flip the brush to line up properly. Now switch the x, y, z veiw
so that your looking at the top of the brush and zoom in using
the 'insert' or 'delete' keys.
Bended Columns
This will show you how to make an object that
seems to be very popular in many maps. I've never
used it but thought it would be good to at least show
how it's made. It's an object that is truly a pain to make.
I've eliminated the texture window to get a really good veiw
of the work. Go ahead and draw a basic brush as pictured
below. Bring it toward the edge of the surface you want to
connect it to. Remember that the initial length of the brush
will affect the point at which it makes contact . Now go up
to the toolbar and select 'curves' then 'more end caps, bevels'
and finally 'square endcap'. You'll notice that the actual
curve will always face the top of the brush. For this tutorial
this will be just fine but for other objects you may have to
flip the brush to line up properly. Now switch the x, y, z veiw
so that your looking at the top of the brush and zoom in using
the 'insert' or 'delete' keys.
 Now hit the 'v' key to activate the vector tool. The vector is
similar to the edge tool but is capable of manipulating more
that one face at a time without switching veiws. You'll use this
feature most often to change curved brushes. You'll see little
pink and green boxes that outline the brush. The objective
will be to drag the boxes so that the curved surface lines up
with all four sides of the bounding box. Try to do this by using
the screen shots below as a quide.
Now hit the 'v' key to activate the vector tool. The vector is
similar to the edge tool but is capable of manipulating more
that one face at a time without switching veiws. You'll use this
feature most often to change curved brushes. You'll see little
pink and green boxes that outline the brush. The objective
will be to drag the boxes so that the curved surface lines up
with all four sides of the bounding box. Try to do this by using
the screen shots below as a quide.
 Now the brush should look like a basic rectangle. The
reason you have to use a curved patch(brush) to start
out with is that a standard brush cannot bend. You can
only move the edges. Time to bend this baby!
Now the brush should look like a basic rectangle. The
reason you have to use a curved patch(brush) to start
out with is that a standard brush cannot bend. You can
only move the edges. Time to bend this baby!